Sunday, December 30, 2012

An Earthy Herb Tart


Over the Christmas break at my parent's home, we watched a cooking show in which the cook was making a salmon and arugula tart.  I had never actually paid attention when watching someone make a tart crust because I didn't think I would ever be able to make one or even want to try to make a crust from scratch.  While watching this show, I thought to myself, "I could do that."  Homemade crusts can definitely be intimating but the cook on this show made it look so easy.  Reveling in that determination, the below tart recipe was created.

I actually came up with the herbed crust combo on Wednesday morning but couldn't decide what to fill the crust with until Thursday afternoon. After much thought, I decided to combine the simplicity of zucchini and squash with the buttery herb crust.  I thought it would allow a good balance and help the tart keep an earthy vegetable flavor at the same time.  I was also hoping to prevent that heavy feeling you get sometimes after eating a breakfast tart.  I wanted to keep the filling light and clean.

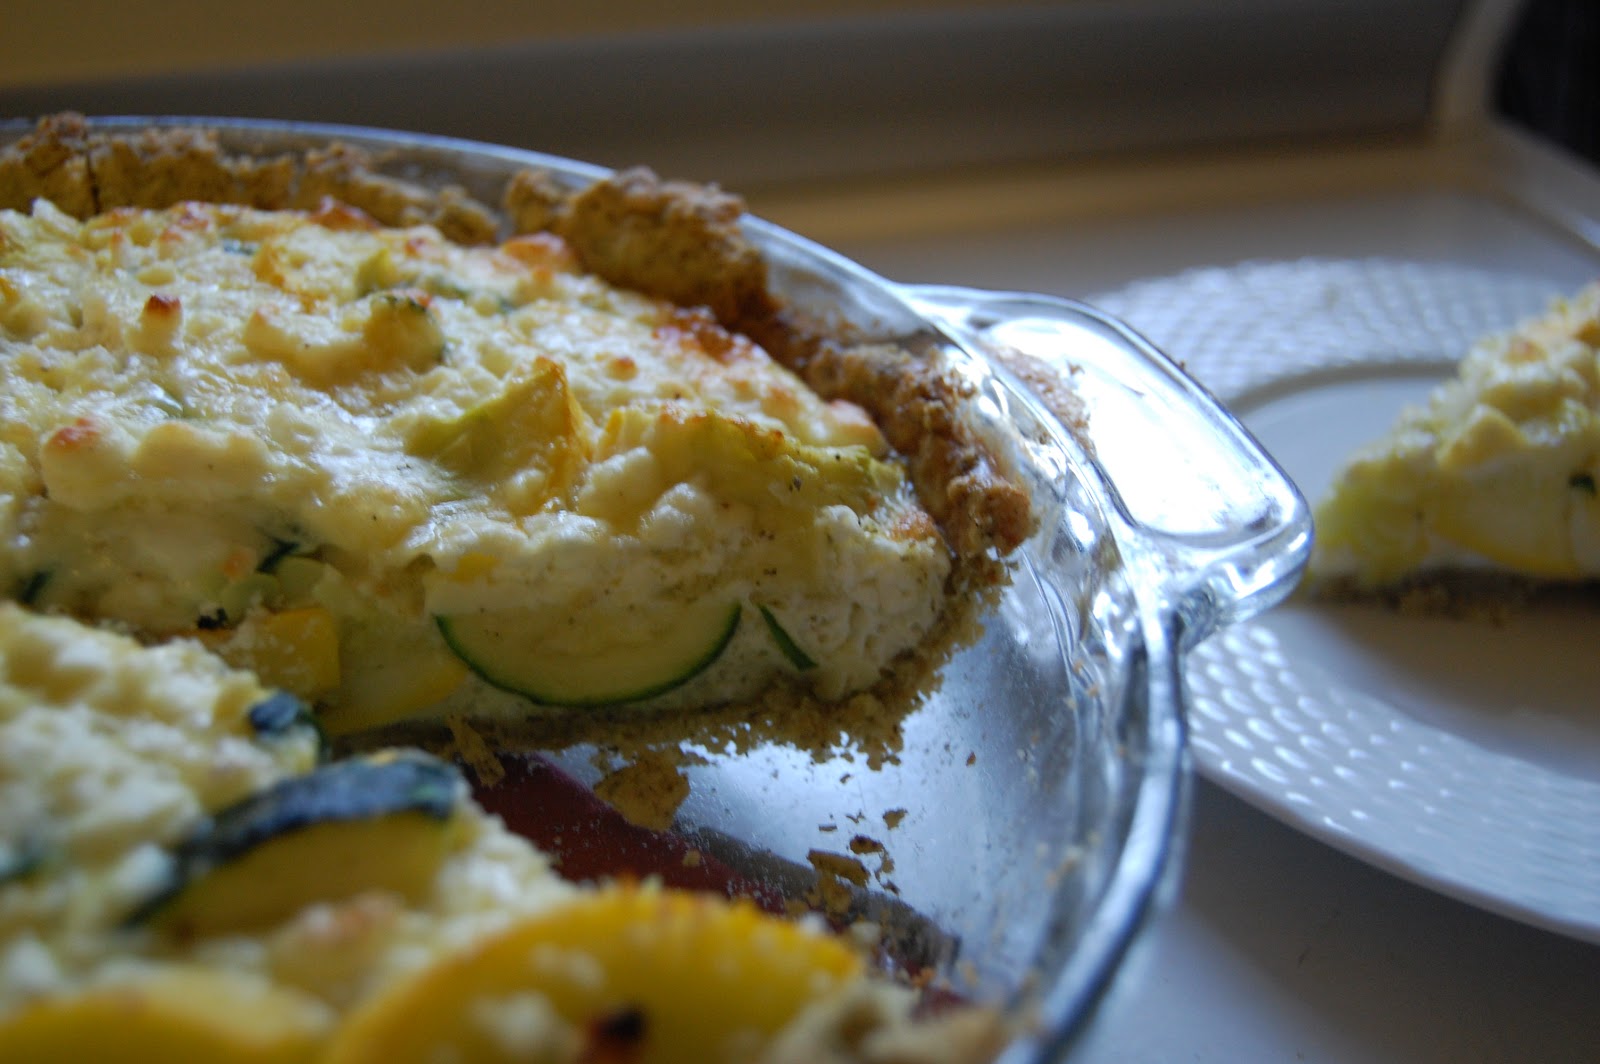
I am really happy with how this recipe turned out.  It looked so beautiful and tasted so delicious. I ate three pieces yesterday (spaced throughout the day- don't judge me) and had one this morning for breakfast.  If you aren't a huge fan of egg whites, just use 6 whole eggs instead.  Also, make sure you salt the whisked eggs pretty well whenever you get to that step, otherwise it might turn out a little bland.  If you try this, I hope you enjoy it!

           ...............

Zucchini, Squash, and Goat Cheese Herbed Tart

Crust
1 1/2 cups of flour
1/2 teaspoon Kosher salt
1/4 scant teaspoon of pepper
1 tablespoon dill
1 tablespoon parsley
1/2 cup of butter, cut into tablespoon sections

Filling
2 medium zucchini, chopped
1 medium squash, chopped
4 egg whites
3 whole eggs
4 ounces goat cheese
salt and pepper

Add flour, salt, pepper, dill, and parsley to a food processor.  Process until mixed thoroughly, about 15-20 seconds.  Add sectioned butter to the food processor.  Process until butter is mixed thoroughly with the flour mixture.  Take crust dough and mold into a ball.  Place the ball on a piece of plastic wrap and wrap tightly.  Place dough in the fridge to chill for 10 minutes.

While the dough in the fridge chilling, preheat the oven to 350 degrees.

Meanwhile, place the chopped zucchini and squash in a skillet lightly oiled.  Salt and pepper to taste.  Saute for about 5-7 minutes or until the vegetables are slightly soften.  Place vegetables and skillet to the side.

After the 10 minutes of chilling are complete, take the dough out of the fridge and unwrap it from the plastic wrap.  Take the dough and place it on a floured surface.  Roll dough out until it is about 10 inches in diameter and a little over 1/4 inch thick.  Place dough in a pie dish and press to fit.  (Imperfection is perfectly fine here.  Just try to fill as many holes as possible.)  Thoroughly prick the edges and bottom of the dough with a fork.  Bake the dough for 10 -12 minutes or until lightly browned.

While crust is baking, separate out four egg whites and add to a large mixing bowl.  Add three whole eggs to the bowl as well.  Whisk until well mixed.  Add salt and pepper.  Whisk again. Place to the side.

After the crust is lightly browned, take the pie dish out of the oven and gently spoon in the zucchini and squash into the crust.  Sprinkle the goat cheese all over the top of the vegetables.  Pour the whisked eggs over the vegetables and cheese.  Bake at 350 degrees for 35-40 minutes or until the goat cheese is lightly browned.  Cool for about 15 minutes before serving.  Enjoy!

          ...............


Saturday, December 29, 2012

Back Home from the Holidays


Merry Christmas and Happy New Year! I am back to the blogging after a short holiday break.  This year we were able to travel up north to be with our families.  We were so blessed by the time we got to spend with them.  I can't even begin to say how much we appreciated the sweet conversations, brunches, dinners, and fun we had with each person.  Below are just some small glimpses into our awesome holiday time.

Ava getting ready for some Christmas magic.

Christmas Eve Brunch

My sweet Mother in her awesome kitchen

Harlie the Christmas Dog

The beginnings of Audrey's delicious brunch dish

Super excited Brayden

Setting up for Christmas Day Dinner

Wednesday, December 19, 2012

Sun-dried Tomato Pesto

 For some reason, I have recently been on an Italian food kick.  I am not normally draw to anything Italian (besides pizza) so this desire is kind of strange to me.  The other day I decided to make a pesto and pasta dish inspired by this one at 101cookbooks.com: http://www.101cookbooks.com/archives/red-pesto-ravioli-recipe.html

Instead of using straight olive oil in my pesto, I decided to swap out about 90% of the olive oil for chicken broth.  With the ingredient switch up, I only actually used 2 tablespoons of olive oil in the entire pesto.  The original recipe calls for 1/3 cup.  For those of you out there that can eat olive oil and not gain five pounds the next day, feel free to ignore my substitution.  However, if you are slightly oil conscious (or hip conscious), try the substitution.  It actually turned out to be a really nice swap.  After Matt had finished his meal, I told him I used chicken broth instead of olive oil.  He said he hadn't noticed any texture difference or taste difference at all.  I consider that a win.

Overall this meal took about 20 minutes to make from beginning to end.  It was so easy to just pull out the food processor, pulse the pesto up, cook some noodles, mix, and serve.  We had our sun-dried tomato pesto over whole wheat spiral noodles mixed with wilted spinach.  It was topped with delicious goat cheese.  If you try it, I hope you enjoy!


Tuesday, December 18, 2012

Aloo Gobi: An Indian Experiment


Yesterday was our first wedding anniversary.  To celebrate, we went out to dinner at a restaurant that has a prix fixe menu.  This restaurant gives five options to choose from in each of the five course categories.  Deciding which option to choose for each of the courses was super difficult for both of Matt and myself.  We debated with each other, went back and forth with ourselves, asked the waitress for her opinion, and then finally decided on what we wanted.  The whole dining experience was divine. I don't use that word very often because I don't often have the chance to.  But this experience cannot be described any other way.  From the first course to the last, this dinner was purely divine and delicious.  One day I hope to cook to one-tenth of the ability of this restaurant's chef.  The whole experience reminded me over and over again why I love cooking (and love eating.)

In my desire to continue stretching my cooking skills, I am posting a link to an Indian dish I made this afternoon for our lunches for the rest of this week.  Here is the link:  http://www.foodnetwork.com/recipes/aarti-sequeira/cauliflower-and-potatoes-aloo-gobi-recipe/index.html  The recipe is called Aloo Gobi which apparently translates to "Cauliflower and Potatoes" according to the Food Network website.

Although I am finding that Indian food actually has the best flavor the day after you prepare it, when I sampled this recipe while cooking, it was really good!  I added an extra serrano pepper for spice and had to switch out the potato.  On Sunday evening , I roasted some vegetables and accidentally used my potato in that dish.  I completely forgot I needed it for this recipe.  So instead of the potato that is called for, I added chickpeas instead.  The chickpeas have that starchy texture like a potato so it was an easy swap.  This was a very easy Indian dish with simple ingredients that most people have access to.  I would highly recommend it if you are up for experimenting with an easy Indian dish. Enjoy!

Sunday, December 16, 2012

Spinach and Ricotta Lasagna Rolls


A couple weeks ago I made a spinach artichoke lasagna that was just not so good.  I had been having a lasagna craving and decided to try a new vegetarian version that I had found.  I didn't even blog about it because neither Matt nor myself enjoyed it at all.  You know how the leftovers can sometimes be better than when the dish is originally served?  Well, that didn't even happen in this situation.  It was definitely a bummer.

So because my lasagna craving was not fulfilled and because we had extra spaghetti sauce and noodles hanging around, I decided to make my own attempt at fulfilling my craving.  If a recipe on allrecipes.com can't do it, I will take things into my own hands.  

Below is my recipe for Spinach and Ricotta Lasagna Rolls.  I was so happy with how they turned out.  This recipe doesn't make a lot so if you are planning on making it for more than three really hungry people, you might need to double the recipe.  For some reason, in my mind I could see kids really like this dish.  The rolls are fun to look at and to put together.  In my experience with lasagna, I have sometimes found that the layers fall apart because they are so filled with sauce and vegetables.  This dish definitely didn't do that.  It is stayed in tact and wasn't so messy to eat.  I hope you enjoy!


This was actually a really fun meal to make and came together a lot easier than I expected.  Outside the noodles cooking and the actual baking time, I think the prep time for everything else was about 15 minutes.  The sauce cooked up nicely in about 10 minutes and while it was bubbling away, I chopped the spinach and mixed it with the ricotta and parmesan. After the noodles were cooked, spreading the cheese and spinach filling on them and rolling them up just took a couple more minutes.

          ...............

Spinach and Ricotta Lasagna Rolls
Prep time: 15 minutes
Cook time: 35-40 minutes
Makes 9 lasagna rolls which could serve about 3-4 hungry people (along with other sides).

Sauce
3 cloves of garlic
1/4 teaspoon of red pepper flakes
1 1/2 cup of spaghetti sauce
1 8oz can of tomato sauce
1 teaspoon onion salt
1 1/2 teaspoon of oregano

Noodle Roll Filling
3 cups spinach, coarsely chopped
3/4 cup of grated parmesan cheese
1 15 oz part skim ricotta cheese
9 lasagna noodles

Preheat oven to 350 degrees.  In a large pot, add salted water and begin to heat.  Once the water is boiling, add noodles.  Cook until just tender.  Strain and let cool. (I quick cooled the noodles by running cold water on them after they were done.)

Meanwhile, pour about a teaspoon of olive oil into a large sauce pan and place on stove at a medium low heat.  Add the garlic and red pepper flakes and cook for about 2-3 minutes.  Stir to prevent burning. Add the spaghetti sauce, tomato sauce, onion salt, and oregano.  Continue stirring.  Heat until the sauce is warmed through and then place the pan to the side.

For the spinach and ricotta filling, coarsely chop the spinach and place in large mixing bowl.  Add the ricotta and parmesan cheese.  Mix well.  Salt and pepper to taste.

Once the noodles are cooked and cooled, lay them out on a flat surface.  Starting at the front of the noodle, spread about 1/3 cup of the spinach and ricotta filling on the noodle.  Only spread the filling about 3/4 of the way up the noodle.  Then starting at the front of the noodle, roll it up and place it in a oven safe dish.  Continue this process until all the noodles and filling are used up.  Then take the sauce and pour it over all the rolls.  Make sure it is spread as evenly as possible over the top of the noodles.

Cover the dish and bake for about 20 minutes.  Then uncover the dish and bake for about 15-20 more minutes or until the sauce begins bubbling around the edges. Enjoy!

          ...............


Saturday, December 15, 2012

Almond Layer Cake with White Chocolate Frosting

When I am searching for a new recipe to try, if the recipe has a picture along with it I am about 1000 percent more likely to give it a shot.  I am one of those people that eats with their eyes. With that in mind, today's post is a photo montage to the Almond Layer Cake with White Chocolate Frosting from Food Network's December issue.  When I saw the recipe in this month's edition, I was immediately drawn to it.  Almond cake?!? Yes, please.  Cream cheese white chocolate frosting?!? Yes, please again! I would not normally make such a decadent dessert if I was wanting to try a new recipe for myself and Matt.  Luckily for me, we had a church small group dinner party on Monday night and I was asked to bring dessert.  If that isn't Providence, I don't know what is.

Here's the link to the recipe: http://www.foodnetwork.com/recipes/food-network-kitchens/almond-layer-cake-with-white-chocolate-frosting-recipe/index.html

From what I can tell from people's reactions and comments, it was a really good cake.  This was actually the first cake I have ever made from scratch.  I don't really have the opportunity to make cakes that often so this probably isn't that big of a deal.  But considering this was my first time, I really do think it turned out well.  The frosting was to die for!  It was so good!  Just so you know, the recipe's frosting amount will easily cover the entire cake and leave you with a little extra.  Having enough icing for cupcakes and/or cakes is always a concern of mine because I love eating some icing.  In my mind, cake isn't cake unless it has a good cake to icing ratio.  If you have the same concerns when trying a new cake recipe, please rest assured with this one.  If it have a reason to try this recipe, I hope you enjoy it too!


Wednesday, December 12, 2012

Couscous Spectacular

When I think of couscous, I immediately think of roasted red pepper.  I am not quite sure why I associate those two ingredients because I don't actually have a ton of experience with either of them but especially with regular, small couscous.  My heart belongs to the larger, Israeli whole wheat couscous which I use in as many recipes as possible.  As I have mentioned in a previous post, on Sunday we had a church potluck after the service.  The Mint Chocolate Chip Bars were one of the items I took.  The other item was a couscous salad with roasted red peppers, spinach, toasted walnuts, parmesan, and feta cheese. 

Even with my lack of couscous experience, I thought making a cold salad would be a nice addition to the church potluck.  Because of my association between couscous and roasted red peppers, I decided to use those two ingredients as the building blocks.  Below you will find the recipe I came up with.  It actually turned out really nice.  We had about three servings leftover after the potluck.  I just took it home, added more chopped spinach, and found myself with three couscous spinach salads for lunch on Monday, Tuesday, and Wednesday.  Quite a nice deal.  I hope you enjoy!


          ...............

Spinach, Walnut, and Roasted Red Pepper Couscous

1 box of couscous (whichever flavor you like best)
1/2 cup of whole walnuts (or 1/4 cup of pine nuts), toasted and chopped
1/2 of a 12oz jar of roasted red peppers, cut into small pieces
2 cups fresh, chopped spinach
2 oz reduced fat feta cheese
1/4 cup of grated parmesan cheese


Preheat oven to 375 degrees.  Place walnuts on a cookie sheet and cook for about 5-10 minutes, or until slightly browned.  Once cooled, chop the walnuts with a nut chopper and set aside. 

Follow the directions on the couscous box on how to best prepare the couscous.  

While couscous is in process, cut the roasted red peppers into small little pieces. Set to the side.  Chop the spinach into bite-sized pieces and set to the side.

Once couscous has completed cooking and has cooled for 10-15 minutes, add the spinach and the roasted red peppers into the couscous.  Mix well.  Add the walnuts, feta, and parmesan.  Mix well.  Salt and pepper to taste.

Serve slightly cooled or around room temperature.  This recipe takes about 30 minutes to make and serves between 5-7 people as a side dish.

          ...............


Monday, December 10, 2012

Super Easy Chocolate Chip Bars


Warning: The world's easiest chocolate chip cookie bar recipe is located below.


A couple of years ago, I asked my mom to put together a family recipe box for me.  I wanted to have some default recipes I knew I could count on in cooking and baking situations.  One of the recipes she included which I have turned to a countless number of times is a recipe for Chocolate Chip Bars given to her by her mom years and years ago.  I am not quite sure where the original recipe came from.  All I know is that it is fool-proof.  Seriously.

Below I am including the original Chocolate Chip Bars recipe that calls for regular semi-sweet chocolate chips. However, before you go thinking that this is a plain chocolate chip bar recipe, think again, my friend. The beautiful thing about this recipe is that you can substitute the chocolate chips out for tons of different things.  I have made substitutions time and time again.  If you are feeling like nuts, just add some pecans.  If you have cranberries and white chocolate chips, just add those.  One time I crushed up some Butterfinger bars, mixed them into the batter, and still the bars turned out beautifully.  They just turn out great every time!  It is quite amazing.  When I made these cookie bars this weekend for a church event, I added some mint and dark chocolate chips to the batter.  The whole bar ended up tasting like a minty little treat!

(PS- If you experiment with this cookie bar recipe, I would love know how it goes!  It would be great to hear if they turned out as well as I am claiming.)


          ...............

Chocolate Chip Bars

1/2 cup butter
1/3 cup white sugar
1/3 cup brown sugar
1 egg
1 cup flour
1 teaspoon vanilla
1/2 teaspoon baking soda
1/2 teaspoon salt
1/2 cup chocolate chips

Preheat oven to 375 degrees.  Take out a 9x13 pan and spray thoroughly with cooking spray.

Mix together the butter, white sugar, and brown sugar.  Add the egg.  Mix well.  Stir in the flour, vanilla, soda, and salt.  Mix in chocolate chips.  Spread batter over the 9x13 pan.  Bake for 15-20 minutes.  Cool and enjoy!

          ...............

Saturday, December 8, 2012

Saturday Morning Sweet Potato Hash

If my morning begins by sitting at a breakfast scenario like the one pictured above, then I know that the day is going to be a good day.

This morning after having about 2 cups of coffee, I decided I was hungry for some breakfast.  Because we didn't eat at home much this week, our fridge was definitely lacking in ingredients.  However, we always have eggs (Praise Jesus!) and we also had a lonely sweet potato.  I bought this sweet potato at least two weeks ago and cannot remember why.  I am sure it was for some recipe that I ended up not making or a recipe I decided to sub out the sweet potato and add something else.  Either way, it was sitting in the fridge begging to be used.  So with that potato as my inspiration, I decided to make a sweet potato hash to go alongside a cooked egg, side of fruit, and big ol' cup of coffee.

This was a simple breakfast with simple spices.  I just grated the sweet potato, added it to a pan that had been sprayed with cooking spray, and let it cook.  I sprinkled the potatoes with Kosher salt and pepper while it was cooking.  I stirred it occasionally to prevent burning.  It took about 15 minutes to cook through.  After tasting the potatoes and knowing they were about done, I heated another pan for my egg.  Although my egg was not beautiful because the yolk broke, I was attempting to cook it over medium.  (That didn't really work out me.)  I sprinkled the egg with salt, pepper, garlic powder, and chili powder.

In the end, the dish reminded me of a little bird's nest.  It was so cute and simple. The orange color of the sweet potato against the white and yellow of the egg was also really pretty.  I couldn't help but smile while eating it.


Friday, December 7, 2012

Popcorn for a Movie Premiere


This week has been a fun, busy, and celebratory week. Also a week filled with eating out, hence the lack of blog posts.  If I am honest with myself and everyone else, very few creative kitchen adventures were happening.

*Monday was Matt's birthday. We didn't actually get to celebrate it on Monday because his final grad school project was due.  Instead of doing anything out of the ordinary, we ran by his favorite fried chicken stand and got him some dinner there.  Because I hate that chicken stand with a passion (and don't eat chicken), I made the world's easiest pot pie recipe that night for my dinner.  As a reminder, here's the link:  http://laundryroomkitchen.blogspot.com/2012/10/the-worlds-easiest-dutch-oven-vegetable.html    (Is it tacky to put a link about one of your own blog posts in another blog post?)  It was again delicious and we ate the leftovers for lunch throughout the week.

*Tuesday we went out to trivia with some friends. We got second place which means we got $30 in bar cash which means we will be going again sometime very soon.  We are very excited about that!

*Wednesday was Matt's birthday celebration dinner out.

*Thursday we double-dated it up with some sweet friends at our favorite local restaurant.  Thanks for a fun night, Lily and Joe!

However, before the Thursday double-date action began, Matt and I took on the task of making one hundred cups of popcorn and putting these one hundred cups of popcorn into one hundred small sandwich baggies.  Why in the world might we be doing this?  Because my husband is a dedicated teacher that is why.

Matt leads a Movie Club throughout the school year and Friday was the premiere of the Movie Club's big movie.  Matt had everything prepared for the showing. He had a red carpet for the Movie Club kids to walk down. He had other students to act like paparazzi. He was prepared to interview each Movie Club kid about their role in the film. The only thing he needed was popcorn for his movie viewers to enjoy.  Luckily for him, he married a woman who loves to make some popcorn.   I often scoff at people who make microwave popcorn.  Why make microwave when making homemade popcorn with oil, popcorn kernels, and a large pot is just so easy and so much tastier?!?  And with that mindset, we set off on filling one hundred small bags with some homemade popcorn.


The movie premiere was a hit and so was the popcorn!  Matt only had about ten bags out of the one hundred left when the event was over. I am guessing that the rest of the popcorn will 1) be eaten by myself or 2) used as a Christmas decoration.  Only time will tell!
          ...............

Homemade Popcorn Instructions

Add enough oil to cover the bottom of a large pot that has a lid.  Turn heat on medium.  Add enough popcorn kernels to cover about 3/4 of the bottom of the pot.  Add lid and keep heating.  Once you hear the first kernel pop, give the pot and lid a good shake.  Shake periodically throughout the popping process, every 1-2 minutes.  Once there is a lull in the kernels popping (about 5-10 seconds between pops) turn off heat.  Pour into another big bowl.  Add salt, butter, or whatever your heart desires. Enjoy!

          ...............